
Set-up
Set-up
Prior to setting up and aligning the robot, place the duplicator tower on a flat tabletop that is stable.
Check the drive trays vertical alignment. Use an accurate level instrument to adjust the table’s horizontality if necessary.

Dexterix utilizes a single button operation system that allows the user to set up the robot in an intuitive way. Each of the 9 marginal LED lights represents a location where discs can be transported to and from. The front most LED represents the duplicator’s drive trays and the other eight LEDs, four on each side, represent the disc bins that may be used.
The 10th LED, located centrally, in front of the control button, is the Menu LED. The Menu LED will change color every three seconds when the control button is kept depressed, cycling through the 4 possible Dexterix operating modes. Each Menu LED color signifies a different mode, as follows:
1. Menu LED Green – Configuration Mode; you may select the disc bin configuration.
2. Menu LED Red – Positioning Mode; you may position the bins or the robot
3. Menu LED Orange – Demo Mode; Dexterix moves discs without communicating with the tower.
4. Menu LED Off (No light) – Ready Mode, Dexterix is ready, waiting for commands from the tower.
To select an operating mode, release the button when the color of the Menu LED corresponds with the desired mode.
Each operating mode is explained below:
Menu LED Green (Configuration Mode)
This mode allows you to choose the number and location of the disc bins you are going to use for the automated disc duplication. To enter the Configuration Mode keep the control button depressed until the Menu LED turns green, then release it. Dexterix enters this mode by default on power up.
Once in Configuration Mode, each subsequent click of the button will select a certain configuration of disc bins. Dexterix can work with various numbers of blank disc bins, ranging from 1 up to 7. You may choose the desired configuration depending upon the number of discs to be processed (the number of bins used) and the amount of available space around your duplication tower.
The LED colors will indicate where the disc bins will be placed. The surrounding green lights represents the blank disc bins, the orange LED shows where the rejected discs will be delivered to and the red light represents the processed disc bin (place an empty bin here). By default, the rejected discs will be placed in front of the tower, under the drawers. There’s no need to place a bin there.
Three examples are shown below:

Note: The bins represented in green are filled with blank discs. The red one must be empty.
Menu LED Red (Positioning Mode)
This mode allows you to align the robot with the tower as well as to position the disc bins corresponding to the selected configuration.
To enter the Positioning Mode, hold the button depressed until the Menu LED turns red, and then release the button. Each subsequent click will cause one of the surrounding LEDs to turn orange, corresponding to the position to be aligned (either align Dexterix with respect to the tower’s drives when the front-most LED is orange, or position one of the disc-bins when its corresponding LED is orange).
Menu LED orange (Self Demo Mode)
When the Menu LED is orange, Dexterix will go into a self demo mode. In this mode the robot does not communicate with the tower but it continuously moves discs to and from the bins to an open drive tray in the tower. When performing the Self Demo Mode, a drive tray must be left open. To select this mode, keep the button depressed until the Menu LED turns orange, and then release it. About 5 seconds later, Dexterix will begin picking up discs from the first available blank disc bin, placing them into the open tray, picking them up from this same tray and moving them to the empty disc bin. When all discs have been completed, Dexterix will reverse the process and continue on indefinitely.
Note: Align the robot with the tower and place the bins before running the Self Demo Mode.
Menu LED off - No Light (Ready Mode)
When the Menu LED is off, Dexterix is in Ready Mode and awaits commands from the duplication tower.
Configuration and positioning procedures must be completed before attempting to run any duplication task.
Aligning Dexterix With Respect to the Tower
This should be the first step performed, before positioning the bins.
Make sure the top of the tower and Dexterix’ bottom are free of dust/foreign particles. Place Dexterix evenly on the top of the tower, with the arm aligned with the center front of the drive tower and the wires facing backwards.
Eject a drive tray using the drive’s eject button and place a regular disc into the open tray.
With the Menu LED set to red (Positioning Mode), click the control button repeatedly until the front-most LED (representing the drive trays) turns orange.
After 4 seconds the robot will pick up the disc in the open drive tray and move it up and down continuously. As it does so, carefully slide Dexterix on the top of the tower, until the robot is positioned so that the disc is placed centrally into the drive tray. When correctly aligned, the disc lays down perfectly into the tray.
To confirm that the tower is vertically aligned, perform this alignment check on each drive by opening the drive tray one at a time and make sure that the disc is placed in the center of the open tray. Adjust the duplicator’s verticality if necessary.
Tip: when the drives are aligned and the tower is vertical, it would be enough to align the robot with respect to the bottom-most drawer. However, make sure you check the disc placement in each tray before proceeding to the bins positioning.
This procedure takes minutes, but it should be performed with special attention and care, since the subsequent accuracy of the disc placement depends on it.
Placing the bins
The robot itself guides the user through the process and the whole bin-positioning procedure takes at most three minutes.
This procedure should be performed after aligning the robot with respect to the tower.
Locate the positioning drum that is included with Dexterix and place the drum into an open drive tray.
With the Menu LED set to red (Positioning Mode), click the control button repeatedly until the LED that corresponds to the bin that you wish to align turns orange, then stop clicking.
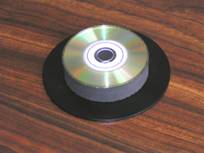
Four seconds later, Dexterix will pick up the positioning drum from the tray, carry and precisely place it to the selected location on the tabletop and stop. You should then transfer a bin-supporting ring over the drum, take the drum away, and then place a disc bin over the ring.

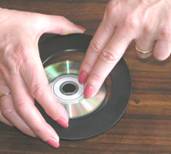

Note: It is important to not move the drum when placing the ring over it. Use both hands: reach one hand through the ring to hold the drum in place while pushing the ring down over the drum with the other hand. Subsequently hold the ring in place while lifting the drum away with the other hand.
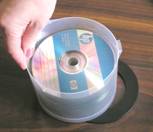

Once the ring set in place, put the disc bin over it: Lay the bin on to the ring as shown in the pictures and then gently slide the bin laterally until it clicks in place over the ring underneath. The bin weight helps keeping the ring in place.
Remember to place a foam spacer disc (included) inside every disc bin.
Repeat this procedure until each bin of the selected configuration is positioned correctly.
The whole bin-positioning procedure takes at most three minutes.
Note: When loading or unloading the disc bins, care should be taken to not move the positioning rings. If for any reason a positioning ring is moved, simply re-position that particular ring by repeating the procedure above for that bin only. However, if the Dexterix relative position to the tower or the tower itself was moved, it may become necessary to reposition all the bins.
Congratulations! You successfully completed the Dexterix setup! The bins are on their places, the robot is aligned and ready to work!